Whether you want to check an old car stereo or install a new one, testing the stereo beforehand is a must. Luckily, you won't need any extra equipment for this job other than your typical 12V car battery. So, how do you test a car stereo with a battery?
In general, the process is simple and can be done with some simple tools. First, you need to identify the positive and negative wiring on your car stereo. The next step is to hook up the wires with your car battery's positive and negative terminals.
Finally, you need to insulate the connections and check if the stereo is working. However, the process isn't as simple as it might look. A simple mistake can destroy your stereo within seconds!
So, I'll cover a detailed and easy guide to safely testing your stereo using your car battery. Let's dive right in.
Table of Contents
A Short-Term Test Setup for Experts
Let's make something clear right off the bat. This process is strictly for experts with deep knowledge of automobile parts and electrical systems.
Proceed to the next method if you're a beginner. Otherwise, you might damage the stereo or hurt yourself during the process.
So here's what you need to do:
Refer to the Stereo Wiring Diagram
Before anything else, completely disconnect the battery and stereo wires from your car. Now, on the back of the stereo, you'll see a wiring harness. Take it off to expose the connector pinpoint of the stereo.
Check out the wiring diagram for your vehicle model. Typically, it will meet the ISO 10487 standard for the connectors. Inspect the diagram and identify socket A on your stereo.
Add Jacked Wires to the Pinpoints
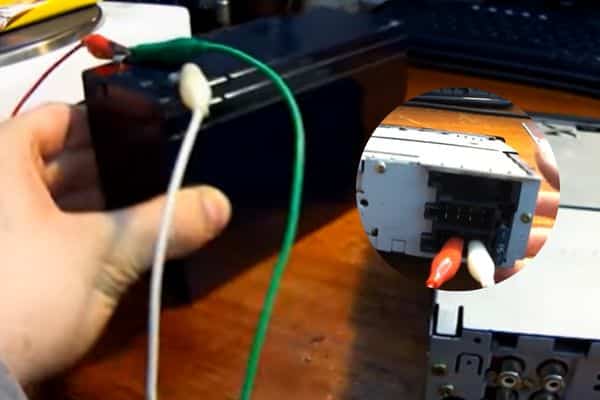
On socket A, you'll notice 8 holes or pinpoints for connection. Take a red, a black, and a green wire with a jack in the end. On the exposed end of the wire, add alligator clips to establish a secure connection with the car battery.
Take the black wire and connect it to the eighth pinpoint of the socket (A8 Ground). Attach the red wire to the fourth pinpoint (A4 +12V battery). Lastly, secure the green wire to the seventh pinpoint (A7 +12V switched).

Connect with the Battery
Let's attach the other ends of the wires now. Connect the green and red wires to the positive terminal of your car battery.
Similarly, the remaining black wire should be attached to the negative terminal.
Once you've established all the connections properly, power on the stereo to see if it works.
Note: It's best if you can add a fuse to the wirings as it will protect the stereo
Let's Get Introduced To The Stereo Wiring System First
Understanding the wiring system of your car stereo is essential to make correct attachments. The stereo harness has many wires of different colors.
Thankfully, you only need to recognize three stereo wires to test car stereo with battery. Which includes:
Red Wire: This is the power or ignition wire of your car stereo. It's mostly attached to the wiring harness.
Yellow or Blue Wire: This is the power or ignition wire of your car stereo. It's mostly attached to the wiring harness
Black Wire: It's the ground wire of your stereo harness. This wire might be absent in some old-fashioned stereos. In that case, you can use a bare metal to function as a ground.
5 Quick and Easy Steps of Testing Car Stereo with Battery
Now that you have a general idea of the wirings, let's get into the process of testing car stereo with battery. Let's have a look at the following infographic with a short explanation first.

Steps 1: Take Necessary Precautions
If you're using your car's 12V battery, make sure it's completely disconnected. Wear a rubber glove just to make sure you don't feel any shock or vibration.
While working, carefully place all the wires far from each other so that they don't touch and pass power.
Finally, add a fuse or circuit breaker if possible.
Steps 2: Collect the Required Tools
For this process, you'll need a few regular tools that you can easily find in your toolbox. Gather the following things for added convenience.
- Wire strippers or cutters
- Alligator clips
- Soldering iron or connectors
- Insulation tape and extra wires (optional)
Steps 3: Connect Stereo Wires
This step is important for powering your stereo. First, use the wire stripper to remove about 1/2" of the insulating layer from the red, black, and yellow wires of the stereo harness.
After that, carefully connect the exposed ends of the red and yellow wires by twisting them.
You can use a soldering iron to secure the connection. Also, add wire connectors or insulation tape to protect the wires from damage.
Crimp the paired wires on the alligator clip and do the same for the black wire. As mentioned, don't allow any of the wires to come close and ensure maximum safety.

Steps 4: Attach the Wires to Your Car Battery
You can identify the positive and negative terminals of your car battery from the (+) and (-) signs on it.
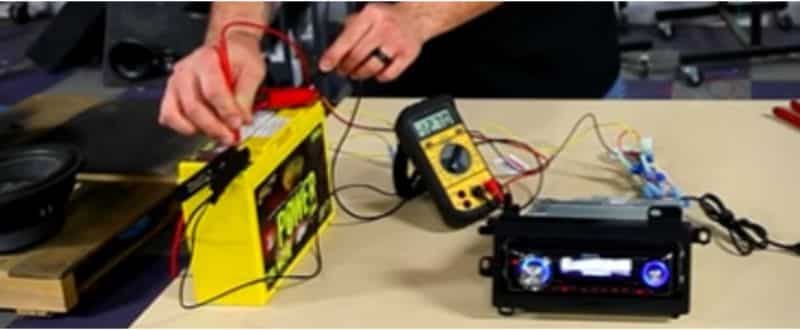
Attach the red and yellow wire pair to the positive terminal and connect the black wire to the negative one. Use extra wires if the length seems too short.
Make sure the connections are secure and insulated. You can follow the same pairing process to test car stereo with battery charger.
Steps 5: Test Your Car Stereo
Now that you have done everything as instructed, it's time to test if the stereo is powered.
Turn on the device and it should light up instantly, thanks to the power coming from the battery.
Wrapping Up!
So, that was everything on how to test a car stereo with a battery. If you're a professional and just want to know whether the stereo works or not, go with the first method. It's quick and can be done with only a few tools.
To establish a long-term connection with the battery, follow the other process instead. You'll be able to test, run, and operate your stereo using the battery power. Just make sure the battery is charged, and you can enjoy your favorite music without any interference.

I’m the founder of CarAudioHunt, where I share over a decade of hands-on experience in car audio—starting from my early days in a car garage in 2013. With a background in wiring, assembling, and tuning, I created this platform to offer practical guides, expert tips, and unbiased product reviews for DIY car audio enthusiasts. My goal is to make CarAudioHunt the leading global resource for car audio knowledge, built on trust, quality, and real-world expertise.
