Not sure how to install a battery isolator for car audio without risking a dead starter or tangled wiring? If you're adding a second battery to support your system, isolating it the right way is non-negotiable.
I’ve installed dozens of isolators in both daily setups and SPL builds. It always comes down to three things: clean wiring, proper placement, and balanced power flow.
This guide outlines the exact steps I follow in every install, so you can wire your isolator with confidence and keep your system running reliably. Before I get into the wiring, let’s start with the tools and materials you will need.
In This Article
- Tools & Materials Checklist
- Pre-Installation Safety & Prep
- Step-by-Step Installation Guide
- Step 1: Plan your isolator mounting location
- Step 2: Securely mount the isolator
- Step 3: Connect the main battery to the isolator input
- Step 4: Connect the isolator output to your secondary battery
- Step 5: Ground both batteries properly
- Step 6: Wire amps and accessories to the secondary battery
- Step 7: Reconnect grounds and test voltages
- Battery Isolator Wiring Diagram for Car Audio
- Common Mistakes to Avoid
- People Also Ask While Installing
- Where should a battery isolator be installed?
- Do I need a fuse between the battery and the isolator?
- What size fuse should I use for isolator wiring?
- Should I remove car fuses while the battery is connected during installation?
- How do I know if my battery isolator is bad?
- Does the battery isolator affect car audio performance?
- Where does the yellow wire go on a battery isolator?
- Can I use this setup with lithium batteries?
- Final Thoughts
Tools & Materials Checklist
Here’s everything you’ll need to follow along and install safely:
- Battery isolator (smart isolator, relay, or manual switch)
- 4–8 AWG wire (based on system size and distance)
- Inline fuses (one for each battery terminal)
- Crimp connectors and heat shrink tubing
- Wire stripper/cutter, power drill, wrench set
- Optional but recommended: multimeter, voltmeter, distribution block
Pre-Installation Safety & Prep
A few precautions can save your system and your fingers:
- Disconnect the negative terminal of your main battery. Always the first step.
- Choose a safe, dry mounting spot for the isolator, ideally away from engine heat and vibration.
- Confirm alternator output. I always check that the alternator provides enough current to charge both batteries efficiently. For older vehicles, an upgrade might be required.
Step-by-Step Installation Guide
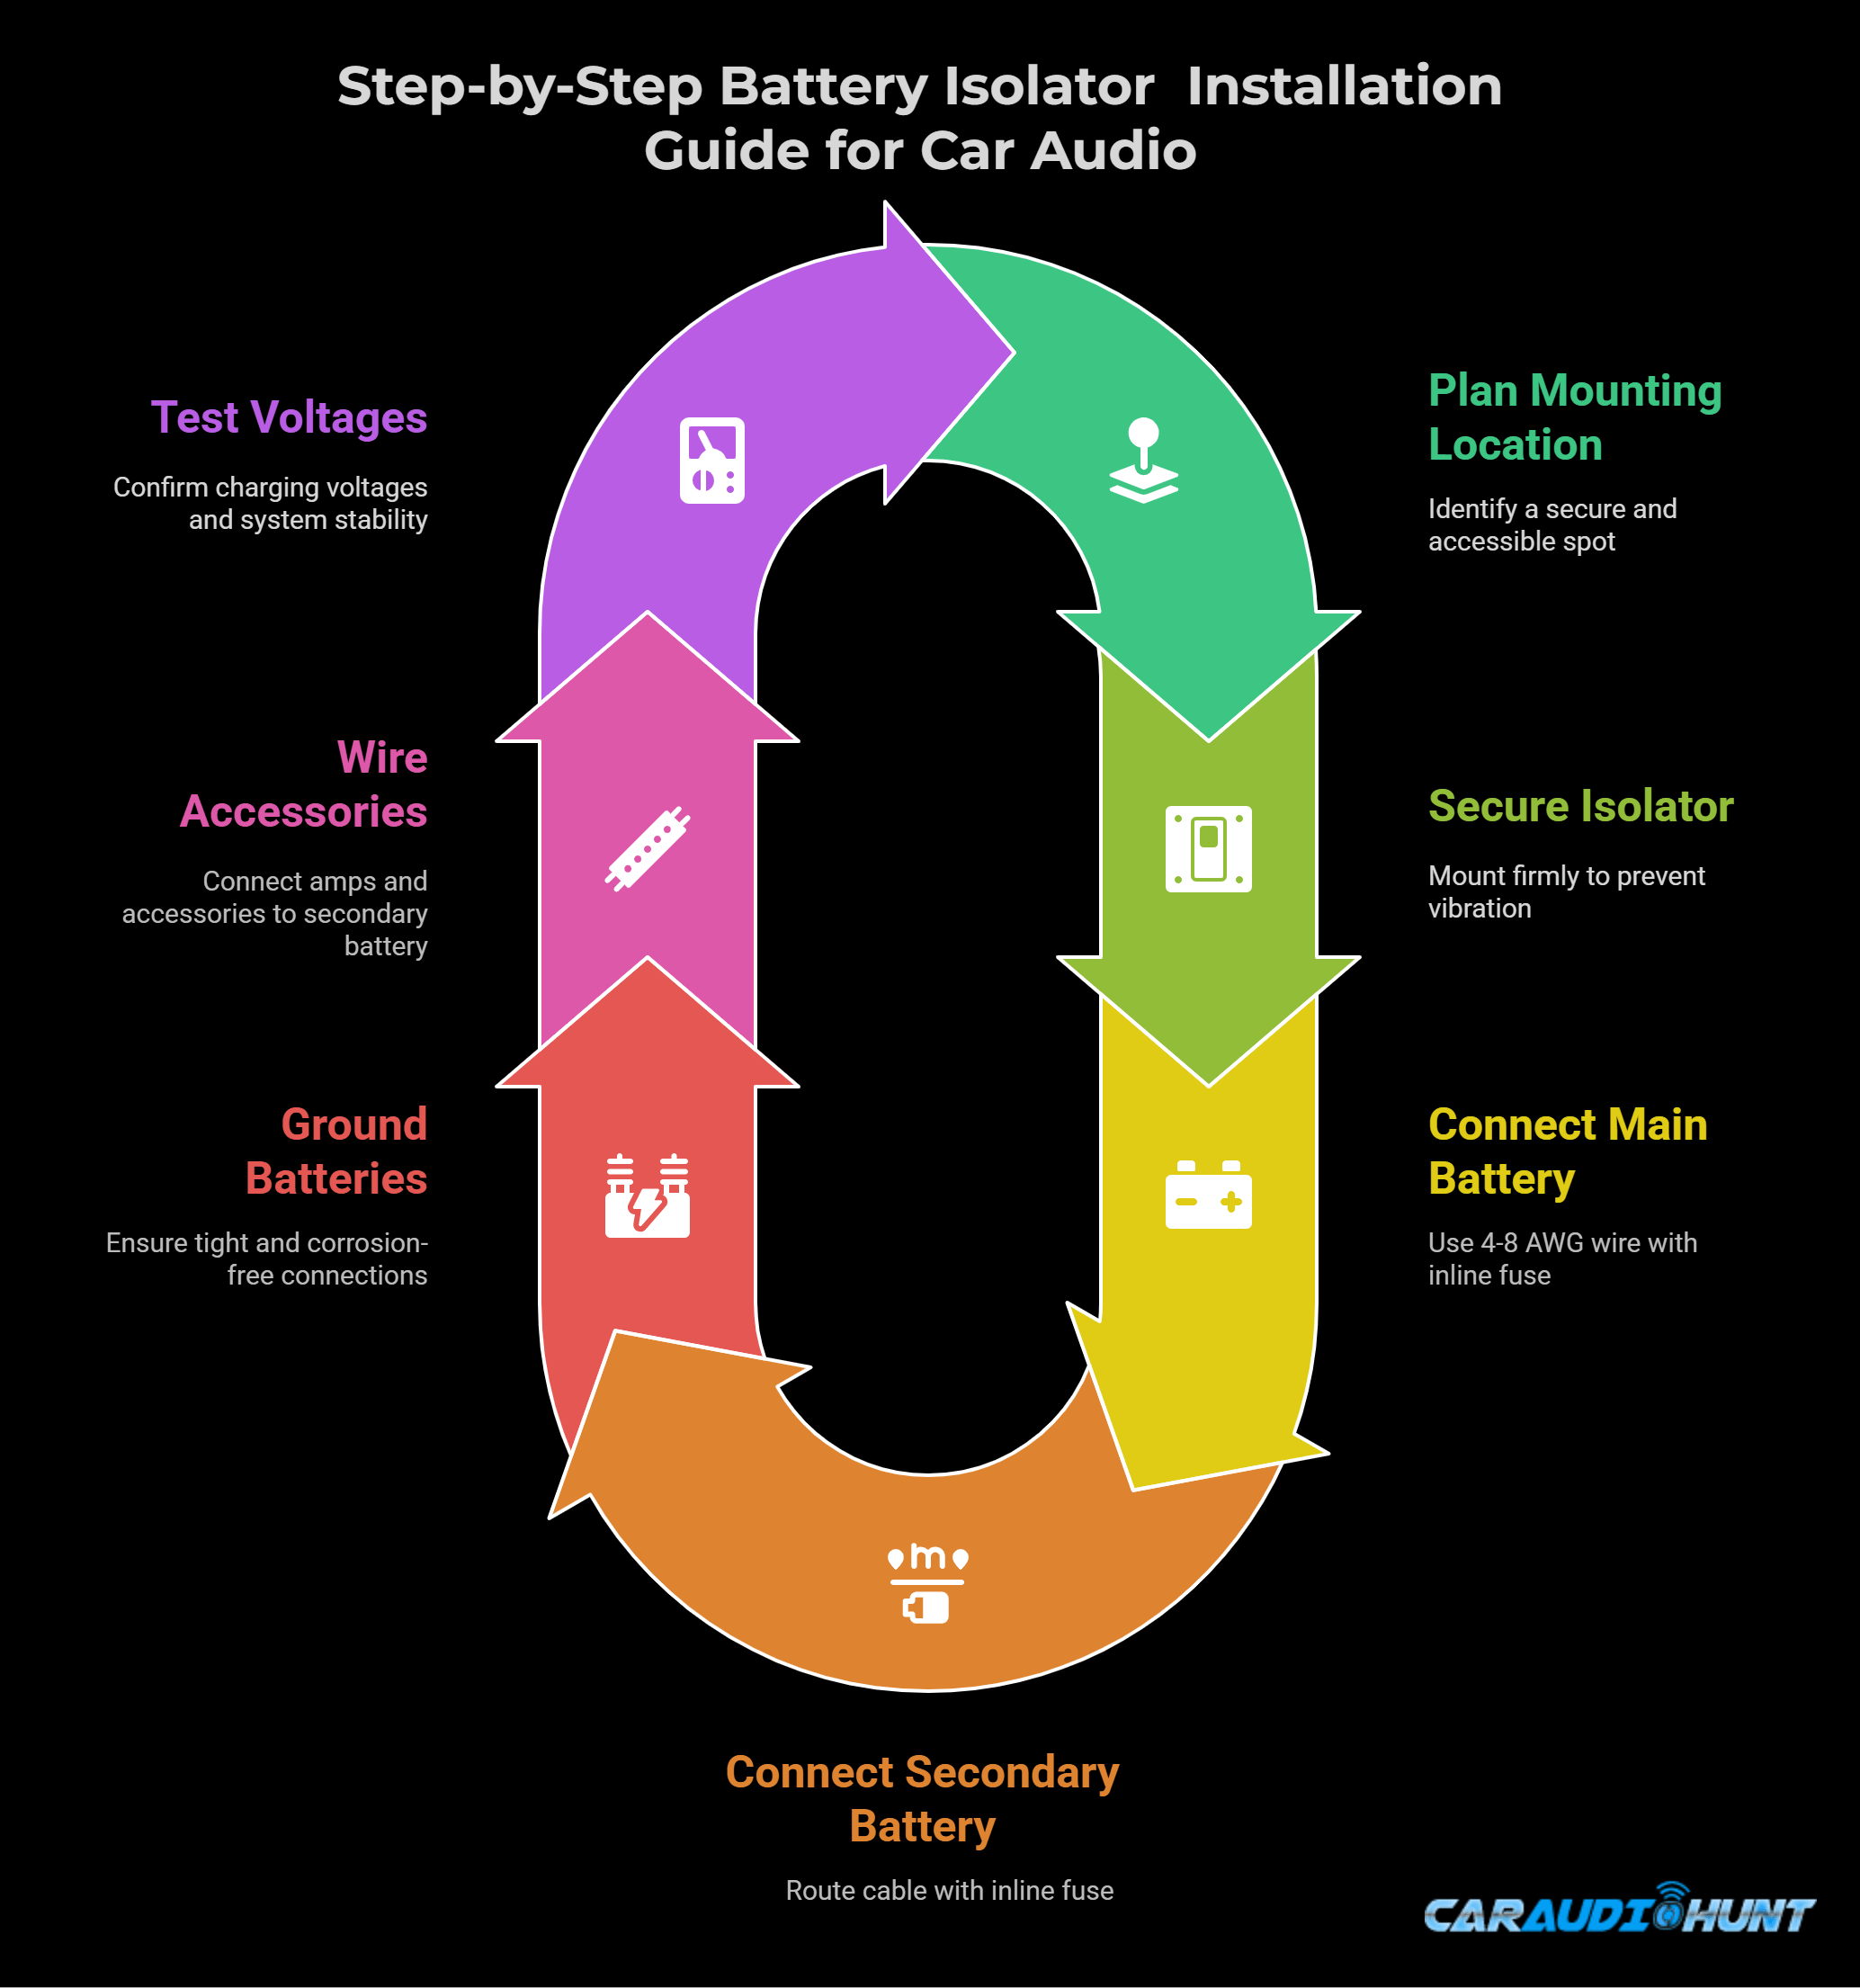
Each step below ensures a safe, efficient battery isolator setup that supports your car audio system with clean, isolated power.

Step 1: Plan your isolator mounting location
Start by identifying a secure and accessible location under the hood, like the fender wall or firewall. It needs to be protected from heat and moisture. I measure wire runs early to avoid voltage drop and future rewiring hassle.
Step 2: Securely mount the isolator
Using screws or bolts, mount the isolator to a solid metal surface. I always make sure it’s firmly fixed to prevent vibration damage over time. Some isolators come with mounting brackets and use those for a cleaner install.
Step 3: Connect the main battery to the isolator input
Use 4–8 AWG wire to run a connection from the main battery’s positive terminal to the isolator input. I always install an inline fuse rated slightly above the expected draw, placing it within 12 inches of the battery for safety.
Step 4: Connect the isolator output to your secondary battery
Run a cable from the isolator’s output terminal to the positive post of the auxiliary battery. Be sure to install an inline fuse close to the second battery. This ensures the auxiliary battery only receives charge when the isolator allows current to flow.

Step 5: Ground both batteries properly
Run a dedicated ground wire from each battery’s negative terminal to a clean, unpainted chassis point. Make sure the connections are tight and corrosion-free using star washers for solid contact. Good grounds are non-negotiable.
Step 6: Wire amps and accessories to the secondary battery
Now route all amplifiers, lighting, and accessories to the auxiliary battery using a fused distribution block. This approach prevents overloading the starter battery circuit and helps maintain cleaner power delivery to your audio components.
Step 7: Reconnect grounds and test voltages
Once everything is in place, reconnect the starter battery ground and start the engine. With a multimeter and confirm both batteries read around 13.5–14.8V when charging. I always test the system under load to verify current sharing and system stability.
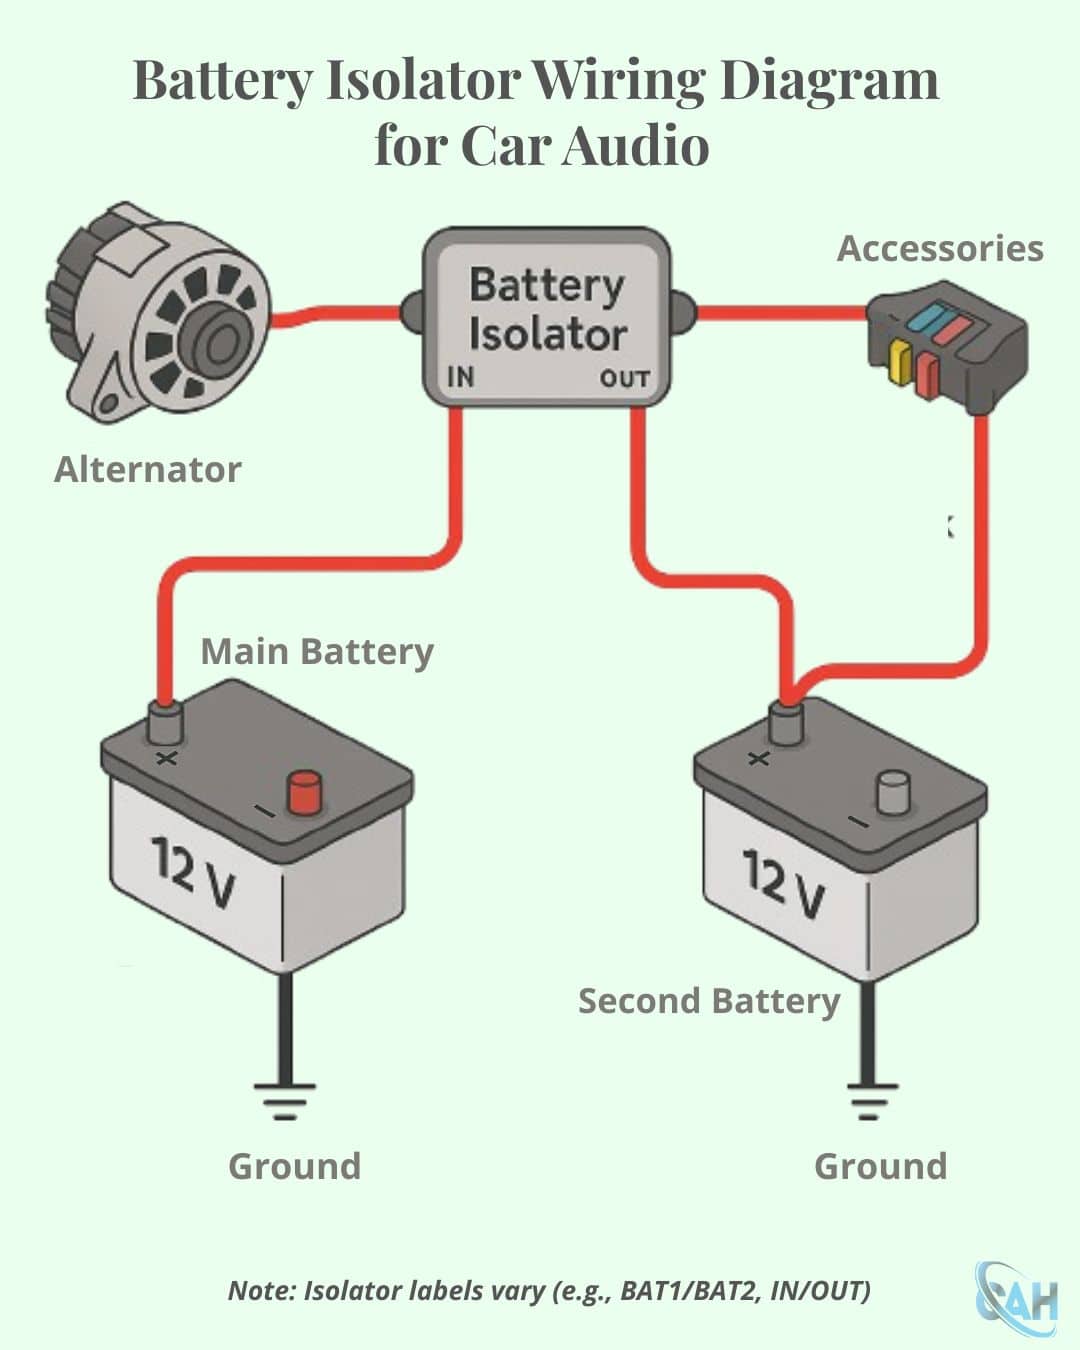
Battery Isolator Wiring Diagram for Car Audio
The diagram illustrates my standard battery isolator wiring setup for car audio systems, showing all key connections and fuse placements for a clean and reliable installation. Be sure to match it against your planned wiring before proceeding.

Battery Isolator Wiring Diagram for Car Audio
Common Mistakes to Avoid
Here’s what I’ve seen go wrong in the field while wiring car audio battery isolator:
People Also Ask While Installing
I often get these questions from DIY builders and installers:
Where should a battery isolator be installed?
Always install it on the positive wire. This is where it can safely control power flow and maintain proper system isolation.
Do I need a fuse between the battery and the isolator?
Yes. Each battery cable to or from the isolator must be fused near the battery terminal to protect against shorts or overheating.
What size fuse should I use for isolator wiring?
Fuse size should match your wire gauge and expected current draw. I often use 100A–125A for 4 AWG wire, depending on the load. To explore more about fuse size, read this guide: caraudiohunt.com/car-audio-fuse-size-guide
Should I remove car fuses while the battery is connected during installation?
Disconnecting the battery is safest. If you don’t, be very cautious and avoid grounding any live wires.
How do I know if my battery isolator is bad?
Check for voltage at both terminals while the engine is running. If your second battery isn't charging, it may be faulty.
Does the battery isolator affect car audio performance?
Yes—in a good way. It ensures stable power to amps and reduces noise from other electrical systems.
Where does the yellow wire go on a battery isolator?
Usually to an ignition or accessory circuit to signal activation. Always check your isolator’s manual.
Can I use this setup with lithium batteries?
Yes, but only with smart isolators made for lithium. I always verify compatibility to protect the battery management system.
Final Thoughts
Learning how to install a battery isolator for car audio is a game-changer for anyone running amps, DSPs, or auxiliary gear. It keeps your system reliable, protects your starting power, and stabilizes your amps.
This is exactly how I build high-reliability dual battery systems. If you are still shopping for an isolator, check out my Battery Isolator Comparison Guide to match the right one to your setup. And if you need help wiring your second battery, do not miss my Second Battery Installation Guide for Car Audio.
Similar Articles You Might Read:

