You’ve likely invested a good deal into your car audio system, like powerful amps, subwoofers, and maybe even sound-deadening upgrades. But if the lights dim when the bass hits or your system cuts out under load, your factory alternator could be the silent culprit. In my experience working with high-demand setups, this is one of the most common signs that a car audio alternator upgrade is overdue. Stock alternators simply aren’t designed to support systems pulling 2000 watts or more.
That’s why I put together this guide on how to upgrade alternator for car audio to help you spot the signs of an underpowered electrical system, choose the right alternator for your needs, and wire it up the right way. If you want reliable, uninterrupted performance, getting your power supply right is where it all starts.
In This Article
- What Does an Alternator Do in a Car Audio System?
- 5 Signs You Need a High-Output Alternator
- How to Choose the Right Alternator Upgrade
- Types of Alternator Upgrades
- How to Install an Upgraded Alternator – Step-by-Step
- Wiring Tips for High-Output Alternators
- Do You Need to Upgrade Your Battery Too?
- What Are the Best High-Output Alternator Brands for Car Audio?
- Bringing It All Together
What Does an Alternator Do in a Car Audio System?
Before jumping into any car audio alternator upgrade, it’s important to understand what the alternator actually does in your electrical system. I often describe it as the backbone of your vehicle’s power delivery that constantly working behind the scenes to keep things stable and your battery charged as you drive. If you’ve added a powerful sound system, knowing this role becomes even more critical.
The alternator converts mechanical energy from your engine into electrical energy. In practical terms, it:
- Charges the vehicle’s battery
- Powers all onboard electrical systems while the engine is running
- Feeds current to amplifiers, DSPs, and other car audio components' types
In most stock vehicles I’ve seen, alternators typically deliver 80 to 120 amps that is just enough to support factory systems. But once you add a high-wattage amplifier or multiple subs, that capacity is quickly outmatched.
That’s where aftermarket, high-output alternators come in. Rated for 250A, 320A, or even higher, they’re designed to recharge your battery faster and maintain a steady current flow during peak demand. In my experience, a properly matched alternator is one of the most important upgrades you can make if you want consistent, clean power delivery across your entire setup.
5 Signs You Need a High-Output Alternator
After understanding what your alternator actually does in a car audio system, the next step is knowing when it’s no longer up to the task. I’ve seen many systems suffer from voltage drops and performance issues simply because the alternator couldn’t keep up with the power demand. Here are the most common warning signs that your setup may be underpowered:

5 Signs You Need a High-Output Alternator
1. Dimming Headlights at Volume
This is the most recognizable symptom. If your headlights flicker or fade when bass hits, your charging system is likely overwhelmed.
2. Amplifier Keeps Entering Protect Mode
Frequent amp shutdowns during playback usually point to voltage instability, not faulty equipment. It’s a common sign your power supply can’t support your system's draw.
3. Voltage Drops Below 12V Under Load
Using a multimeter, you might notice voltage sag during high-volume playback. If readings dip below 12 volts, your electrical system is underpowered.
4. Battery Doesn’t Stay Charged on Short Trips
High-draw systems can drain your battery faster than the alternator replenishes it specifically noticeable after short drives or quick errands.
5. You’re Running 2000W RMS or More
Systems in this range require serious electrical support. At this level, relying on a stock alternator isn’t just risky which is often the root cause of voltage-related issues.
If any of these symptoms sound familiar, it may be time to rethink your charging strategy. In the next section, I’ll break down how to size and select a high-output alternator that fits your system’s needs and how to install it for maximum reliability.
How to Choose the Right Alternator Upgrade
Once you’ve confirmed the signs point to an overworked charging system, the next step is choosing the right upgrade. I’ve seen many setups suffer simply because the alternator wasn't properly matched to the system’s needs.
Not all alternators are built the same and picking the wrong one can leave your system just as unstable as before. Power output is crucial, but so are factors like voltage regulation, battery compatibility, and installation complexity. Here’s how to choose smartly:

Steps to Choose the Right Alternator
Step 1: Match Amperage to System Wattage
Start by aligning the alternator’s amperage with your audio system’s total RMS power. Here’s a general guideline I often use:
- 1500W system → 180A or higher alternator
- 3000W system → 250A or higher
- 5000W+ system → 320A+ or dual alternators
Remember that, Overshooting slightly is usually better than running close to the limit you want headroom for stability.
Step 2: Consider Battery Compatibility
Different battery chemistries require different charging profiles. If you’re running lithium or AGM batteries, make sure your alternator is compatible. Some high-output alternators are designed specifically for lithium applications, while others are better suited for sealed lead-acid or AGM setups.
Step 3: Voltage Regulators and Smart Charging Systems
Modern vehicles often use “smart alternators” that reduce output under certain conditions to improve fuel efficiency. If your vehicle uses one, you’ll need to choose an alternator with built-in regulation—or confirm it works with an external voltage regulator. A mismatch here can result in unstable or insufficient charging, even if the amperage looks good on paper.
If you're unsure which battery type best matches your electrical setup, check out this full breakdown of AGM vs lithium battery.
For an in-depth, step-by-step guide on matching your alternator to your system, including key tips on voltage regulation, battery compatibility, and more, check out the complete article here: How to Choose a Car Audio Alternator
Types of Alternator Upgrades
After getting the right amperage and voltage control features for your system, the next decision is how far you want to go with the upgrade. Over the years, I’ve worked with setups ranging from simple bolt-in upgrades to full dual alternator kits and trust me, there’s no one-size-fits-all solution. Let's figure the right type out.
1. Direct Replacement (OEM-Fit High Output)
These alternators are designed to bolt directly into your stock bracket and connect to your existing wiring harness. They’re ideal for daily drivers or mild systems that just need more power without diving into custom fabrication. I often recommend this route for builds under 2000W RMS.
2. Custom Mount Alternators
These require custom brackets and rewiring to fit non-standard positions in the engine bay. While more complex to install, they’re a top choice for SPL competitors and extreme custom builds where factory space is limited or max output is the top priority.
3. Dual Alternator Kits
As the name implies, this setup adds a second alternator; one typically dedicated to your audio system alone. While more expensive and installation-intensive, this is hands-down the most reliable option for systems pushing 5000W+ or for users who want total separation between vehicle power and audio current. I’ve seen dual setups eliminate voltage sag even in the most demanding show builds.
Still weighing your energy storage options? This guide on capacitor vs second battery breaks down when and why to use each.
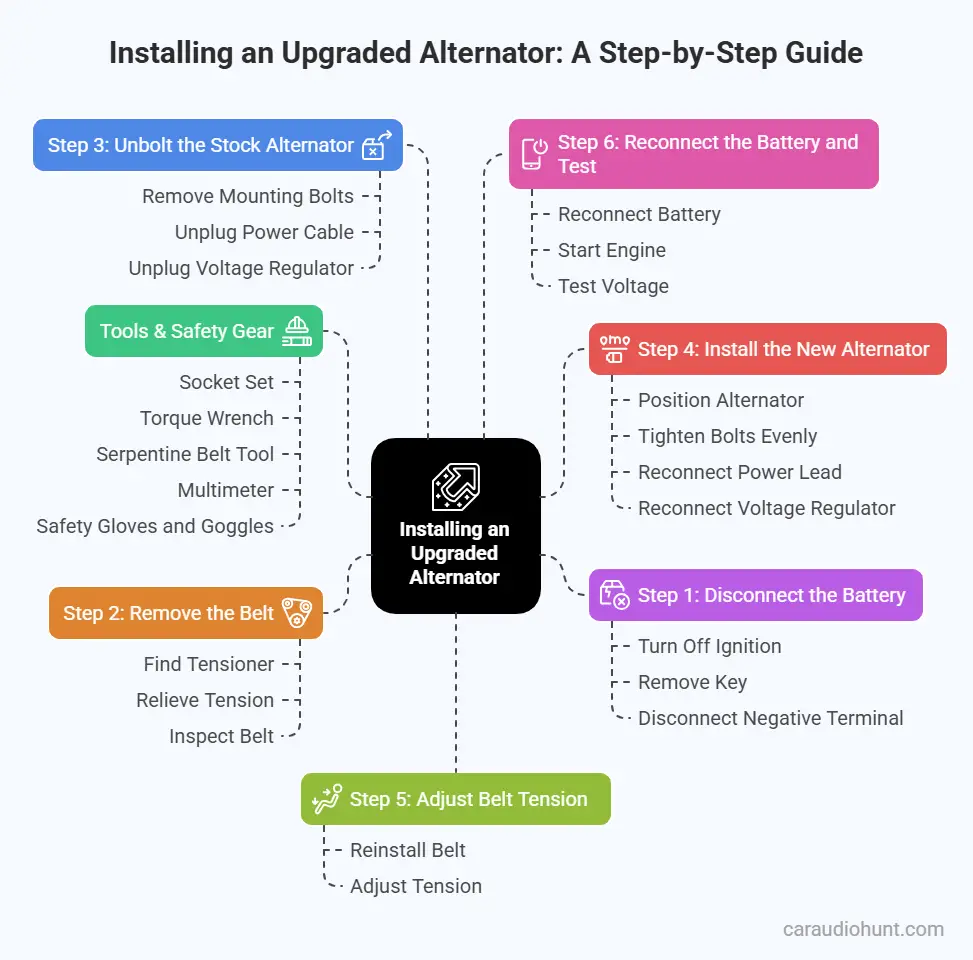
How to Install an Upgraded Alternator – Step-by-Step
Once you’ve selected the right alternator, whether it’s a direct-fit OEM replacement or a full custom mount, the final step is installation. I’ve walked through this process with dozens of setups, and while it isn’t overly complex, it does demand precision. You’re working with your vehicle’s electrical system, so safety isn’t optional but it’s critical.
This step-by-step breakdown is designed to help you handle the install confidently and correctly.

Installing an Upgraded Alternator A Step-by-Step Guide
Tools & Safety Gear You’ll Need
- Socket set
- Torque wrench
- Serpentine belt tool
- Multimeter
- Safety gloves and goggles
Step 1: Disconnect the Battery
Turn off the ignition and remove the key. Begin by disconnecting the negative battery terminal to prevent short circuits or accidental shock. This step protects both you and your vehicle’s sensitive electronics never skip it.
Step 2: Remove the Belt
Find the serpentine belt tensioner and use the proper tool to relieve tension. Carefully slide the belt off the alternator pulley. I always recommend inspecting the belt for cracks or fraying while you're here, if it's worn, replace it now.
Step 3: Unbolt the Stock Alternator
Remove the mounting bolts usually one at the pivot and another at the bracket. Then unplug the main power cable and voltage regulator connector. If bolts are seized, a little penetrating oil and a breaker bar will go a long way.
Step 4: Install the New Alternator
Position your high-output alternator into the mounting bracket. Insert and tighten bolts evenly to avoid stressing the housing. Reconnect the main power lead and voltage regulator harness, making sure connections are clean and secure.
Step 5: Adjust Belt Tension
Reinstall the serpentine belt, ensuring correct alignment across all pulleys. Adjust tension so there’s about ½ inch of deflection when pressed mid-span. Too loose, and it may slip; too tight, and it could damage pulley bearings.
Step 6: Reconnect the Battery and Test
Reconnect the negative battery terminal and start the engine. Use a multimeter to test voltage at the battery terminals. A properly functioning high-output alternator should read between 13.8V and 14.8V. Let the vehicle run for a few minutes and monitor for any voltage dips or fluctuations.
Running multiple batteries? Make sure your system is wired properly and you use proper isolator types in your system. Also ensure you install the isolator correctly through safe and effective setup techniques.
Wiring Tips for High-Output Alternators
After installing your upgraded alternator, wiring is where many builds either shine or fall short. I’ve seen powerful systems underperform simply because the wiring couldn’t support the current. If you want stable voltage and full power delivery to your amplifiers, don’t overlook this critical step.
Even the best alternator can’t do its job if your cables, grounds, or fuses create resistance or bottlenecks.
Upgrade the Big 3
One of the first things I recommend post-installation is the Big 3 wiring upgrade. This strengthens the foundation of your vehicle’s charging and grounding system.
Upgrade these three connections using 1/0 AWG OFC (oxygen-free copper) cable for the best conductivity:
- Chassis Ground → Battery Negative
- Engine Block → Chassis Ground
- Alternator Positive → Battery Positive
This significantly reduces voltage drop and ensures your alternator can push current efficiently through the system.
Want more in-depth big 3 update guide? Check out this: caraudiohunt.com/car-audio-big-3-upgrade
Fuse Ratings and Placement
Protecting your system with the correct fuse is just as important as choosing the right cable. A poorly rated or misplaced fuse is a common failure point.
- Fuse within 18 inches of the battery terminal
- Use an ANL fuse rated slightly above the alternator’s maximum amperage output
For example, if your alternator is rated at 250A, a 275A fuse is typically safe and effective.
Cable Gauge Guide
Choosing the right wire gauge is essential for minimizing resistance and heat. Here’s a quick guide based on your alternator’s output:
- Up to 150A → 4 AWG
- 150A–300A → 1/0 AWG
- 300A+ → Dual 1/0 AWG or a custom high-amperage setup
Need help with fuse sizing or cable selection? Check out this guide on how to size your car audio fuses along with beginner-friendly tips on fuse types and wiring basics.
Do You Need to Upgrade Your Battery Too?
Once your alternator and wiring are dialed in, the final piece of your power chain is the battery. I’ve worked on systems where everything else was upgraded yet performance issues lingered simply because the battery couldn’t keep up. A high-output alternator can supply power, but your battery still plays a key role in storing and delivering it—especially during peak demand or when the engine isn’t running.
Why It Matters
Think of the alternator as the charger and the battery as the reservoir. The alternator keeps the tank full, but it’s the battery that delivers steady current when your system needs it. If your battery is weak, undersized, or mismatched, it limits everything else—no matter how powerful your alternator is.
When to Add a Second Battery
In my experience, these are the clearest signs that it’s time to add a dedicated secondary battery:
- Your system exceeds 3000W RMS
- You experience slow starts or voltage sag
- You frequently play music with the engine off
In setups like these, the main battery alone just can’t provide enough reserve capacity without risking system dips or strain.
Lithium Battery Compatibility
If you’re running lithium batteries, pay close attention to charge control. Many lithium cells require voltage regulation or DC-to-DC chargers to avoid overcharging and extend battery life. Not every alternator is lithium-safe by default, so always check compatibility before installation.
Still weighing the pros and cons? This article breaks down when and why to add a second battery, or If You are Ready to get hands-on, Follow this step-by-step installation guide and I you are Still comparing battery types, Here’s how to choose the best second battery for your setup.
What Are the Best High-Output Alternator Brands for Car Audio?
If your upgraded audio system is drawing serious current, your alternator needs to keep up—period. Based on my in-depth evaluation of output data, build quality, and reliability under load, these are the brands I consider top-tier:
1. Mechman Alternators – The E-Series 370A offers exceptional voltage stability and durability. From my testing, it’s one of the best options for daily drivers and performance-focused builds alike.
2. DC Power Engineering – Designed for systems pushing 3000W+ RMS, the 270XP delivers rock-solid performance in SPL-grade setups where failure isn’t an option.
2. RAREELECTRICAL – For those building on a tighter budget, their 250A alternator holds its own. I’ve found it to be a smart entry-level option without compromising core functionality.
Serious about powering your system the right way? Don’t miss my full breakdown with real-world insights, technical comparisons, and top model links: See Review of the Best Car Audio Alternators for 2025
Bringing It All Together
From my perspective, upgrading your alternator isn’t just another checklist item but it’s a strategic move that safeguards your entire audio investment. Every part of the process matters: from proper wiring and fuse sizing to battery pairing and brand selection. A well-planned car audio alternator upgrade delivers more than just higher amperage that brings long-term reliability, voltage stability, and peace of mind.
If you’ve followed this guide from start to finish, you’re not just chasing louder sound but you’re engineering a system that performs with consistency and purpose. That’s the kind of build I stand behind.
Want to strengthen the rest of your setup? Don’t miss these essential reads:
- Is your car audio system underpowered? Learn the warning signs: caraudiohunt.com/car-audio-system-is-underpowered
- Choosing the right second battery to match your build: caraudiohunt.com/best-secondary-battery-for-car-audio
- Should you run a capacitor or skip it? Find out which setups benefit: caraudiohunt.com/best-car-audio-capacitor
- Step-by-step capacitor installation guide with diagrams: caraudiohunt.com/installing-car-audio-capacitor/

