If your car headlights flicker under heavy bass loads or your amplifier struggles to maintain clean output, your vehicle's electrical system might be the limiting factor. One of the most effective solutions is the car audio Big 3 upgrade.
This upgrade isn't about looks. It directly enhances the electrical foundation that powers your entire sound system. By upgrading three critical wiring paths, you can ensure better current flow, improved voltage stability, and longer-lasting components. From repeated installs and results I've monitored, this upgrade consistently resolves power delivery issues and lays a solid base for future expansion.
Whether you're running a moderate amplifier or a high-output setup, the Big 3 upgrade is the starting point for serious car audio performance.
In This Article
- What Is the Big 3 Upgrade?
- Why the Big 3 Upgrade Is Critical for Car Audio?
- When Should You Do a Big 3 Upgrade?
- What You’ll Need for Big 3 Upgrade?
- How to Install the Car Audio Big 3 Upgrade (Step-by-Step)
- Common Mistakes to Avoid
- Frequently Asked Questions (FAQs)
- Does the Big 3 upgrade really work?
- Will a Big 3 upgrade improve bass or sound quality?
- Will the Big 3 upgrade help with a stock alternator?
- Do I need a capacitor after doing the Big 3 upgrade?
- Can the Big 3 upgrade damage my alternator?
- Will I need a high-output alternator after doing the Big 3?
- Can I do the Big 3 upgrade without adding an amplifier?
- Is copper or OFC wire better for the Big 3 upgrade?
- Do I need to fuse the alternator-to-battery wire?
- Can you do a Big 3 upgrade using 4-gauge wire?
- Final Note
What Is the Big 3 Upgrade?
The Big 3 upgrade strengthens three essential connections in your vehicle’s electrical system. Stock wiring is often inadequate for the current demands of aftermarket amplifiers and upgraded high output alternators. Upgrading these paths with heavy-gauge wire minimizes resistance and voltage drops. I’ve found it is one of the most effective and affordable upgrades to improve current flow and reduce system strain.
The three upgraded connections are:
- Chassis Ground to Battery Negative
- Engine Block to Chassis Ground
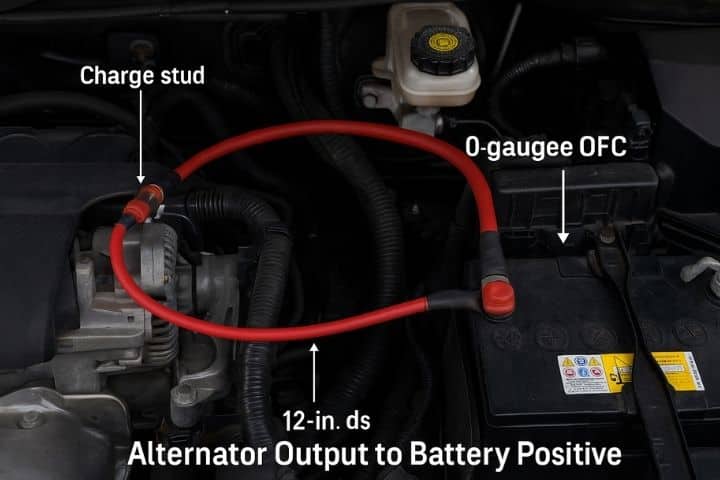
- Alternator Output to Battery Positive
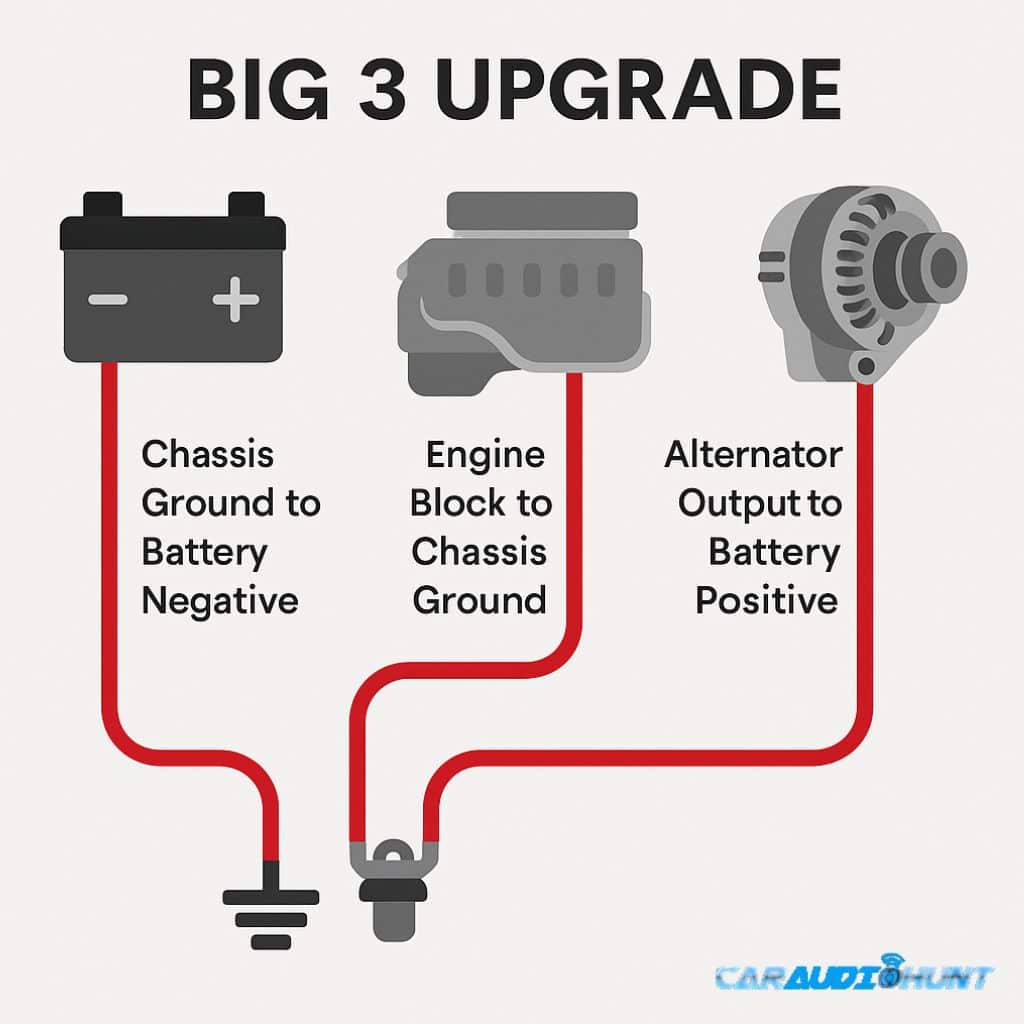
Big 3 Upgrade
These connections reduce resistance, which directly improves voltage stability. In practice, I've measured voltage gains between 0.3 to 0.6 volts in systems pulling moderate to heavy current. That slight boost can prevent clipping, protect gear, and improve amplifier efficiency.
Why the Big 3 Upgrade Is Critical for Car Audio?
Car amplifiers draw substantial current, especially under sustained low-frequency playback. Factory wiring often can’t meet the demand, which leads to symptoms like dimming lights, inconsistent volume, or amp shutdowns. I’ve seen systems that appeared to have tuning issues where the actual cause was insufficient grounding or undersized charging wires.
Take an amplifier rated at 1000W RMS. It may demand over 80 amps of current under load. Without upgraded wire paths, that current struggles to reach the amp cleanly.
A properly installed Big 3 upgrade improves:
- Voltage consistency under load
- Alternator charging performance
- Overall system stability
In systems I’ve tuned after this upgrade, the difference is evident: cleaner bass, less heat buildup, and brighter interior lighting.
When Should You Do a Big 3 Upgrade?
I recommend this upgrade if you're adding an amplifier rated over 1000W RMS, installing a high-output alternator, or planning to run dual batteries. Also, if your voltage drops below 13 volts during playback, this upgrade is worth completing before replacing components or upsizing power.
What You’ll Need for Big 3 Upgrade?
Here’s what I use during installs for dependable results:
- 1/0 AWG OFC (oxygen-free copper) wire
- Ring terminals for each connection point
- Crimp tool and heat shrink for tight, weather-resistant seals
- Wire loom and zip ties to protect and route wiring
- Multimeter for voltage verification
Note: Avoid copper-clad aluminum (CCA) and ensure all materials are rated for automotive use. Inferior wire can overheat and fail under load.
How to Install the Car Audio Big 3 Upgrade (Step-by-Step)
Now that you’ve got the parts in hand and understand why this upgrade matters, it’s time to get into the install. Whether you’re comfortable working under the hood or just learning your way around, this step-by-step process is designed to make the job easy and repeatable. I’ve followed this same process across dozens of vehicles, and with the right prep, it’s absolutely manageable for any enthusiast willing to put in a bit of careful work. Let's explore the steps.
Step 1: Disconnect the Battery
Use a wrench to remove the negative terminal. This prevents short circuits or electrical damage during the install.
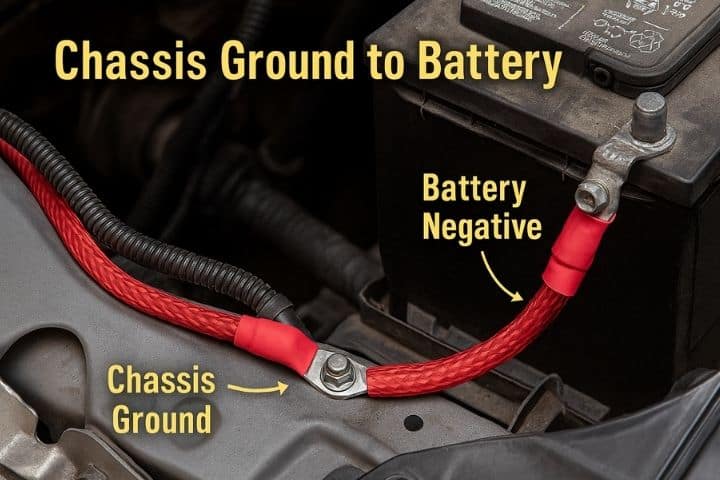
Step 2: Chassis Ground to Battery Negative
Identify a metal location on your car’s chassis near the battery. I usually go for a factory ground point or clean off a painted surface with a wire brush or sanding wheel until I hit shiny metal.
Crimp a ring terminal onto one end of your 1/0 AWG OFC wire and bolt it securely to this ground. Then, route the wire cleanly to the battery and connect the other end to the negative post. Use heat shrink for a clean, weather-resistant seal.
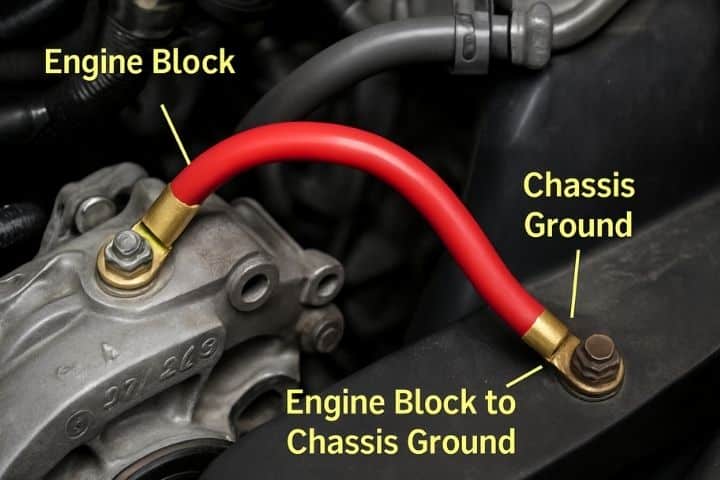
Step 3: Engine Block to Chassis Ground
Locate a grounding bolt on the engine block near the alternator. Repeat the cleaning process and attach one end of a second cable here. Route this cable to the same chassis ground used in step 2.
This connection ensures low-resistance grounding for the engine and stabilizes system current draw.
Step 4: Alternator Output to Battery Positive
Identify the alternator’s charge stud (usually covered with a plastic cap). Measure and cut your wire length from this stud to the battery’s positive terminal. Before connecting, install an inline fuse holder on the wire, placing the fuse within 12–18 inches of the battery. Use a fuse rated for your alternator’s output (200–300 amps is typical). Secure ring terminals on both ends, bolt one to the alternator post and the other to the battery’s positive terminal. Cover all exposed terminals with heat shrink or protective boots.
Step 5: Secure All Wiring
Use split wire loom and zip ties to keep the wiring safe from sharp edges, hot engine parts, and moving components. Secure the loom to factory harnesses where possible.
Step 6: Reconnect and Test
Reconnect the battery’s negative terminal. Start the vehicle and use a multimeter to confirm system voltage at idle. You should see between 13.5 and 14.8 volts. With your sound system active, verify voltage remains stable under load.
Common Mistakes to Avoid
Over the years, I’ve encountered some issues in installs, these issues come up frequently. You must keep in mind these:
- Using undersized wiring
- Failing to clean paint off ground points
- Choosing copper-clad aluminum instead of OFC
- Replacing factory wiring rather than supplementing it
- Skipping the inline fuse near the battery
Each of these mistakes can reduce performance or damage gear. It's worth double-checking every connection before powering up.
Frequently Asked Questions (FAQs)
If you're still unsure about certain parts of the Big 3 upgrade or wondering how it fits into your specific build, these questions come up a lot in my installs and reader messages. I’ve put together clear, experience-backed answers to help you make the right decisions and avoid common mistakes I've mentioned earlier.
Does the Big 3 upgrade really work?
Yes, it absolutely works. I’ve personally seen voltage increases between 0.3 to 0.6 volts in systems after doing this upgrade. That small gain often makes the difference between clean power delivery and frustrating voltage drops under load. If your system is drawing serious current, the Big 3 upgrade is one of the simplest ways to stabilize it.
Will a Big 3 upgrade improve bass or sound quality?
Indirectly, yes. Cleaner voltage means your amplifier won’t struggle to deliver consistent output. That helps reduce clipping and distortion, especially during heavy bass hits. I’ve noticed tighter low-end response and fewer dropouts after a proper Big 3 install, especially in systems pushing over 1000 watts.
Will the Big 3 upgrade help with a stock alternator?
It will. Even if you’re running a factory alternator, upgrading the wiring helps reduce resistance and current bottlenecks. I’ve done this upgrade on plenty of vehicles with stock alternators, and it still made a noticeable improvement in voltage stability and charging efficiency.
Do I need a capacitor after doing the Big 3 upgrade?
Not always. In most cases, the Big 3 solves voltage sag more effectively than a capacitor. Capacitors might help smooth out small dips, but they don’t fix underlying wiring limitations. If you’re still having voltage issues after doing the Big 3, you’re better off checking your alternator output or battery health before adding a cap.
Can the Big 3 upgrade damage my alternator?
No, not if it’s installed correctly. The upgrade actually helps your alternator by lowering resistance in the charge circuit. I’ve never seen a properly done Big 3 cause harm. Just make sure to fuse the alternator-to-battery wire properly and don’t replace factory wiring—always supplement it.
Will I need a high-output alternator after doing the Big 3?
Only if your system demands more current than the stock alternator can produce. The Big 3 helps your alternator perform more efficiently, but it doesn’t magically add amperage. If your system is pulling more than 100–150 amps regularly, then yes, an HO alternator may be your next step.
Can I do the Big 3 upgrade without adding an amplifier?
Absolutely. I’ve recommended this upgrade even for people running factory sound systems who are dealing with dimming lights or weak starts. It improves the entire electrical backbone of your vehicle, not just audio. It’s a solid upgrade for anyone dealing with load-related voltage issues.
Is copper or OFC wire better for the Big 3 upgrade?
Go with OFC every time. Copper-clad aluminum might be cheaper, but it’s less conductive and prone to heating under load. I only use 100 percent oxygen-free copper in my installs because it delivers better current flow and holds up long term.
Do I need to fuse the alternator-to-battery wire?
Yes, always. That wire carries high current and connects directly to the power source. I install an inline fuse within 12 to 18 inches of the battery and match the fuse rating to the alternator output. Skipping the fuse can lead to serious damage if there’s ever a short.
Can you do a Big 3 upgrade using 4-gauge wire?
You can, but I don’t recommend it unless your system is really mild. For anything over 500 watts RMS, I go straight to 1/0 AWG. You want minimal resistance, especially as your system grows. Undersized wire defeats the whole purpose of doing the upgrade in the first place.
Final Note
The Car audio Big 3 upgrade is a foundational step for reliable car audio performance. It helps maintain steady voltage, reduces component strain, and prevents power-related issues long before they arise.
In every serious build I’ve worked on, this upgrade plays a critical role. It’s a simple, affordable improvement that delivers noticeable results when your system demands more than your factory wiring can handle.
Read Related Audio Guides:
